A white ALEX drawer unit can stay stock with new knobs, which costs a few dollars per drawer, or become a Shaker-trimmed dresser, an L-shaped butcher block corner or a sit-stand desk with an adjustable leg.
Wall length decides most of these builds: it sets how wide the DIY Desktop has to be, and a top spanning more than one ALEX unit needs the center support used in the Gaming Setup.
Renters should check the lease first, since the Desk with Slat Accent Wall puts screws in the plaster, while Painted ALEX Drawer Fronts and the Shaker Style fronts need only paint and trim and no bolts.
1. Painted ALEX Drawer Fronts
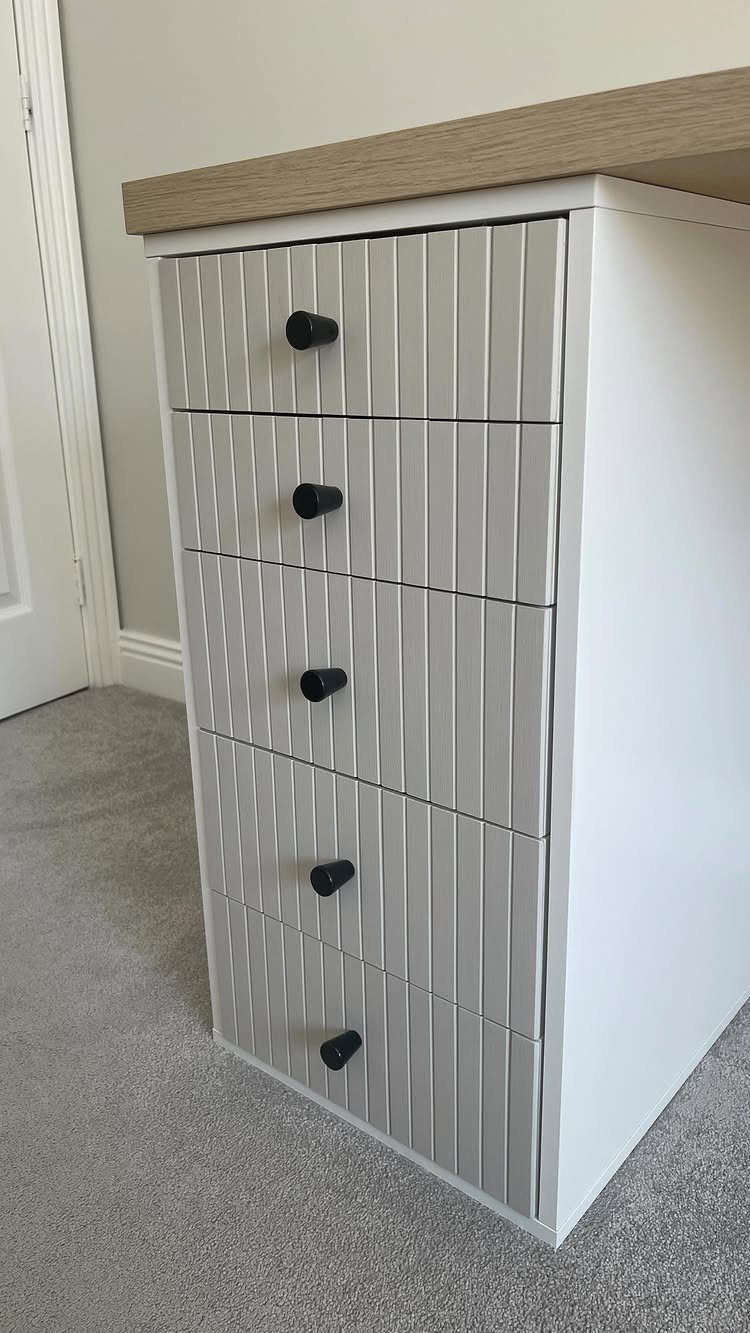
Ribbed drawer fronts take paint well because the grooves hide brush marks, and grey over a white ALEX unit gives a flat white box some depth.
Prime first, then paint; the maker of this one says the fronts were primed and painted in eggshell, a finish I’d pick too, since it wipes clean better than flat paint.
Black knobs finish the look. Swapping hardware costs a few dollars per drawer and takes minutes.
Paint the fronts off the unit, laid flat, so nothing drips in the grooves.
2. Desk with Side Storage
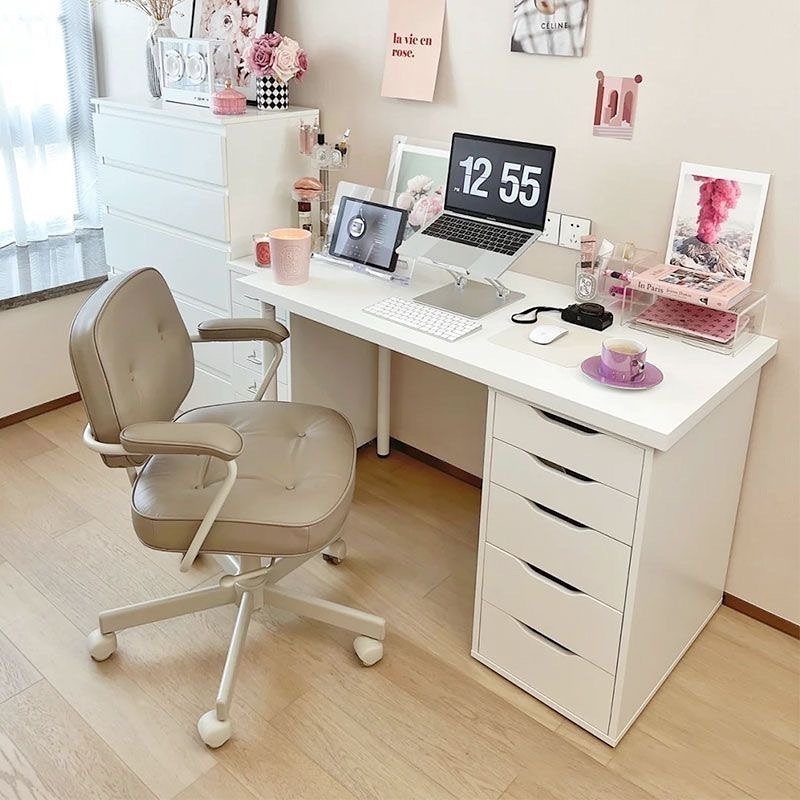
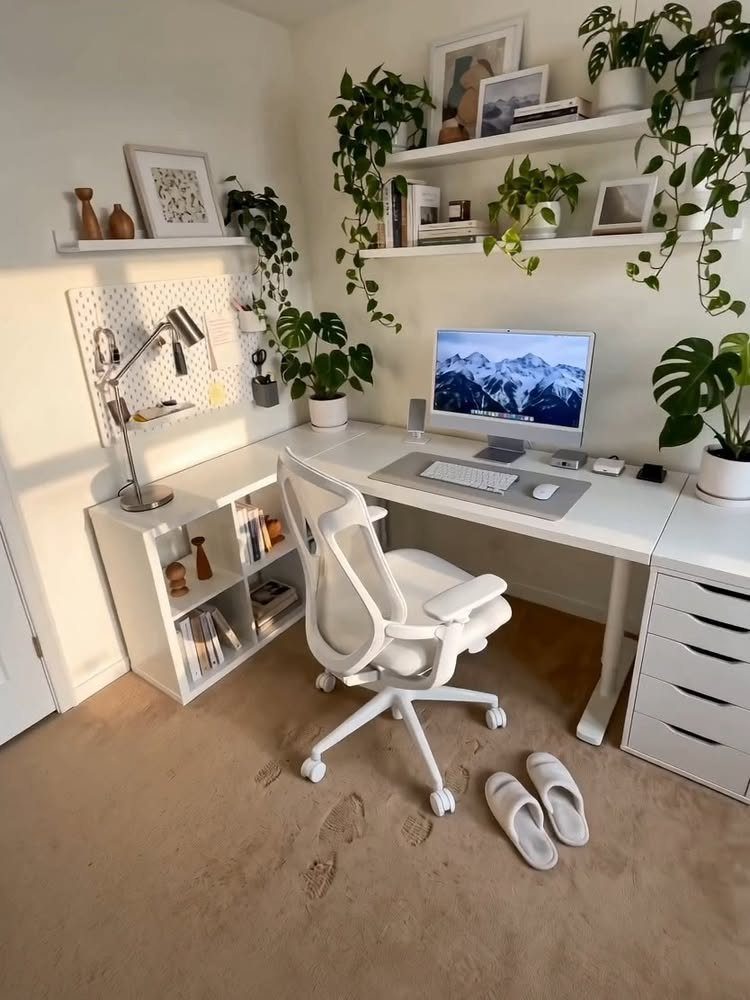
A drawer unit doubling as one side support turns a plain white tabletop into a desk with built-in storage.
Slide an ALEX unit under one end, and the drawers sit right where your hand falls, so paper, chargers and notebooks never leave the work zone.
For renters this suits a small room well, since nothing gets bolted into walls. Keep the open leg side clear for your chair and knees.
A second white piece nearby, like the dresser here, adds overflow storage without crowding the desk itself.
3. Shaker Style ALEX Drawer Fronts
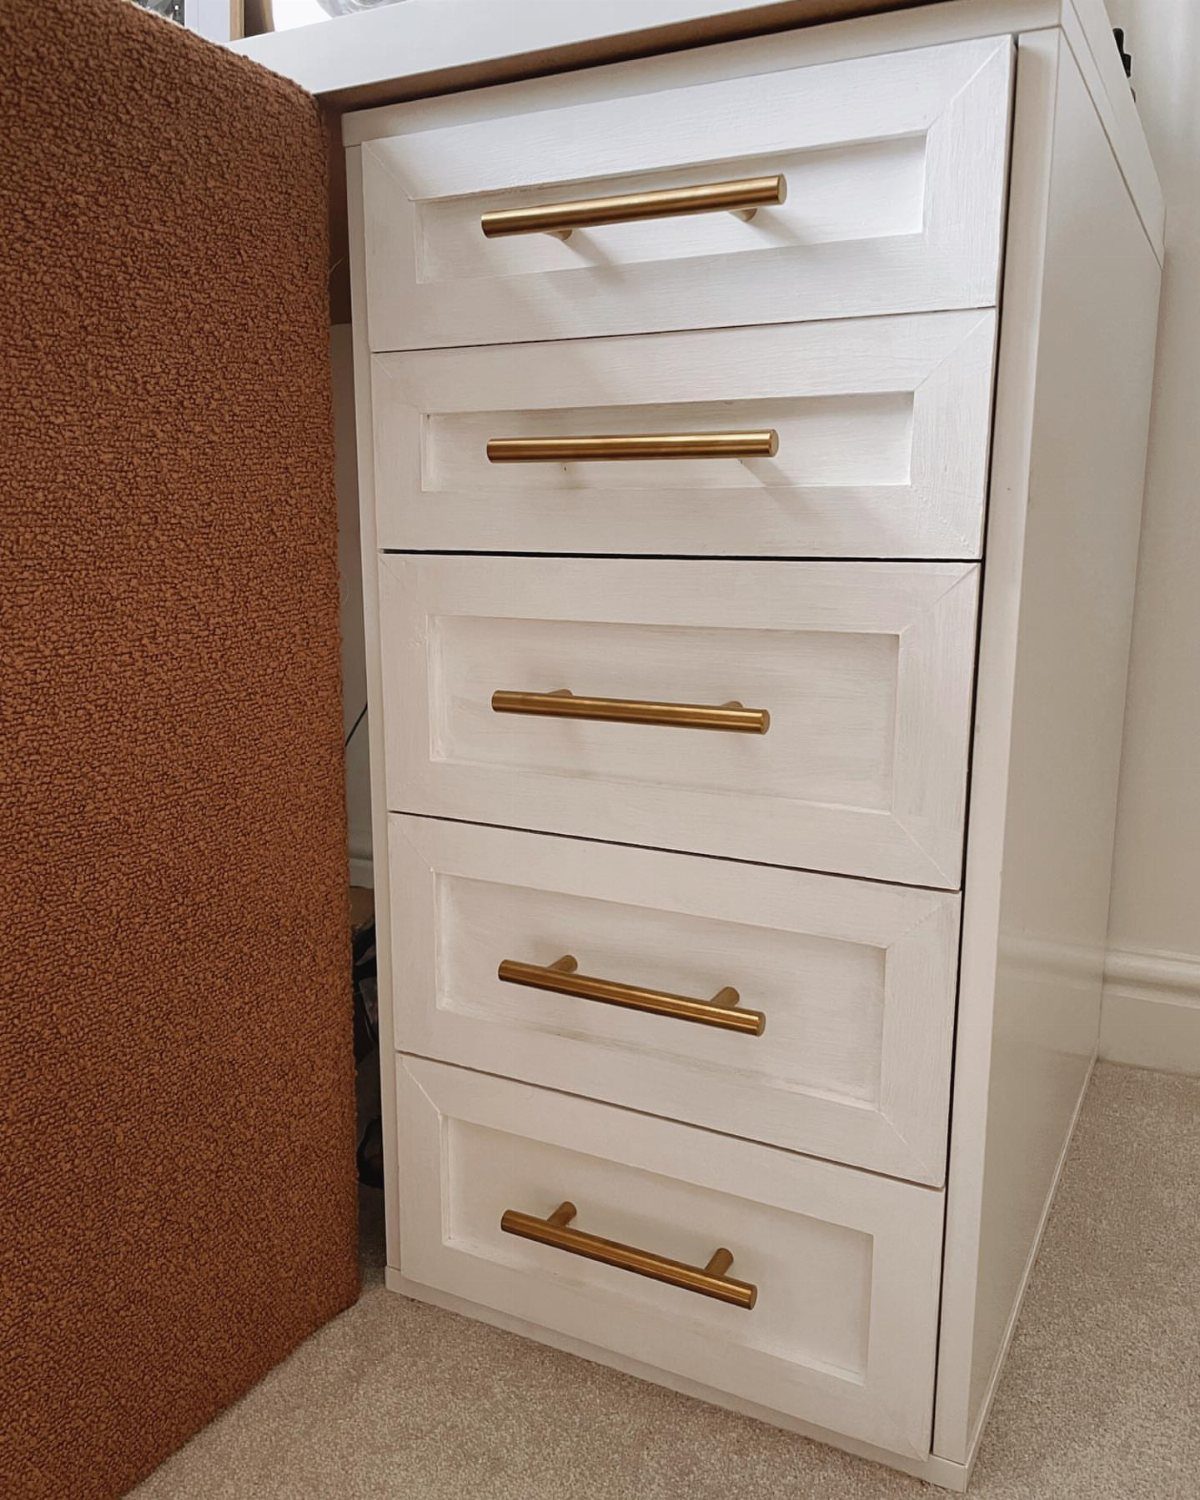
Flat ALEX drawer fronts can pass for a built-in dresser once you add recessed Shaker-style trim. Thin strips framing a center panel give the look, and gold handles warm up the white without any paint at all.
I like this version for anyone who finds the stock unit too plain but doesn’t want to repaint. Cut the trim carefully and glue it on evenly, because crooked frames show immediately on a plain white face.
Keep the handles simple, since the trim already carries the detail.
4. DIY Desktop
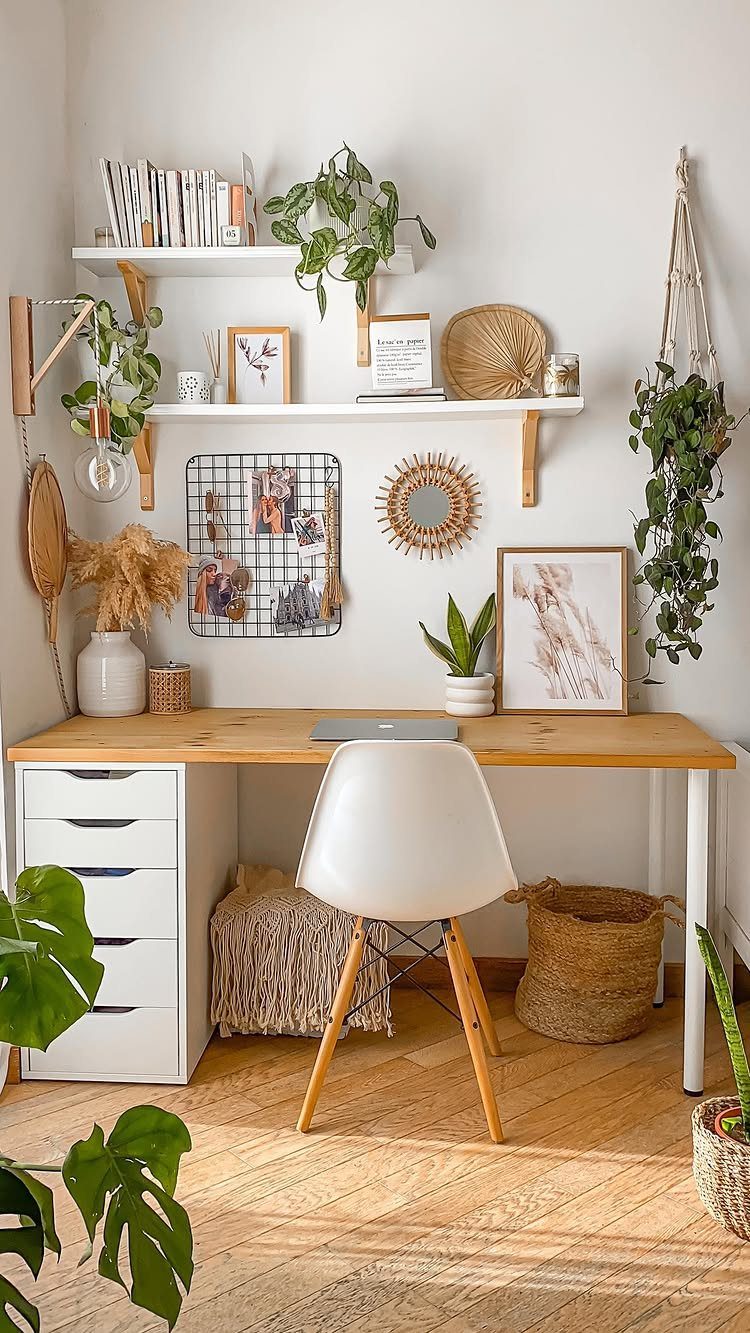
A plywood top cut to your own size solves the biggest problem with stock desks: the length never matches the wall.
Rest it on ALEX drawers at one end and a white leg at the other, and you get a desk sized to the room.
Light birch-type plywood looks warm against white drawers. Sand the edges smooth and seal the surface, since raw plywood marks easily under a keyboard and mug.
This is a good weekend job on a small budget, because one sheet can often be cut to fit.
5. ALEX Drawers with IKEA Countertop
An IKEA countertop laid across ALEX drawers gives you a deep, solid work surface that matches the system, so the pieces look planned together.
Because the slab is sold as a countertop, it is built to take wear better than a thin desktop panel.
I’d choose this over a custom top when you want fewer steps: measure, trim to length if needed, and set it on the drawers.
A matching white finish keeps the whole desk bright, and wall shelves above hold the plants and art.
6. Drawer Organization Hacks
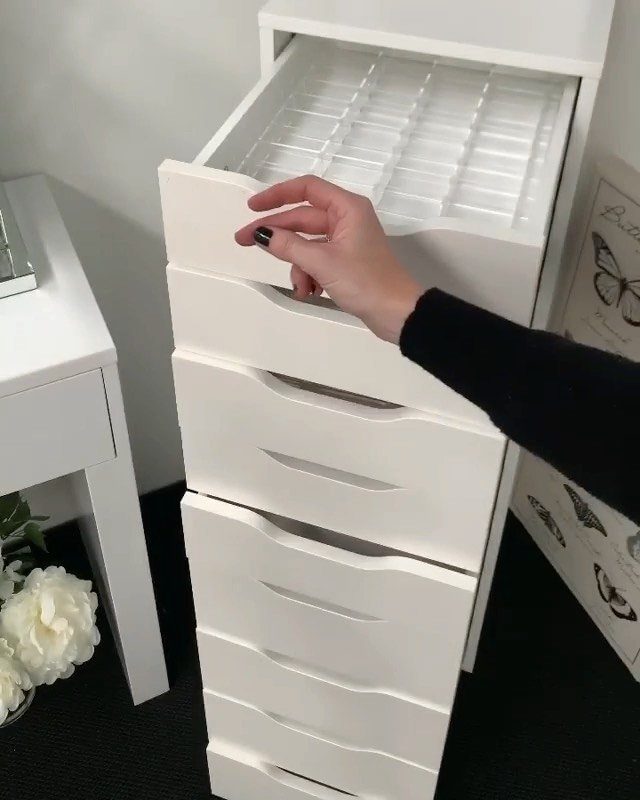
Clear grid organizers inside the top drawer stop pens, cables and sticky notes from sliding into one pile. Pick trays with compartments of different sizes, and measure the drawer’s inside width and depth before buying so they sit snug.
I like clear bins because you see everything at a glance. Put daily items in the top drawer and rarely used ones lower down.
A tray that fits tightly won’t shift each time the drawer opens, which matters more than the brand.
7. L-Shaped Corner Desk
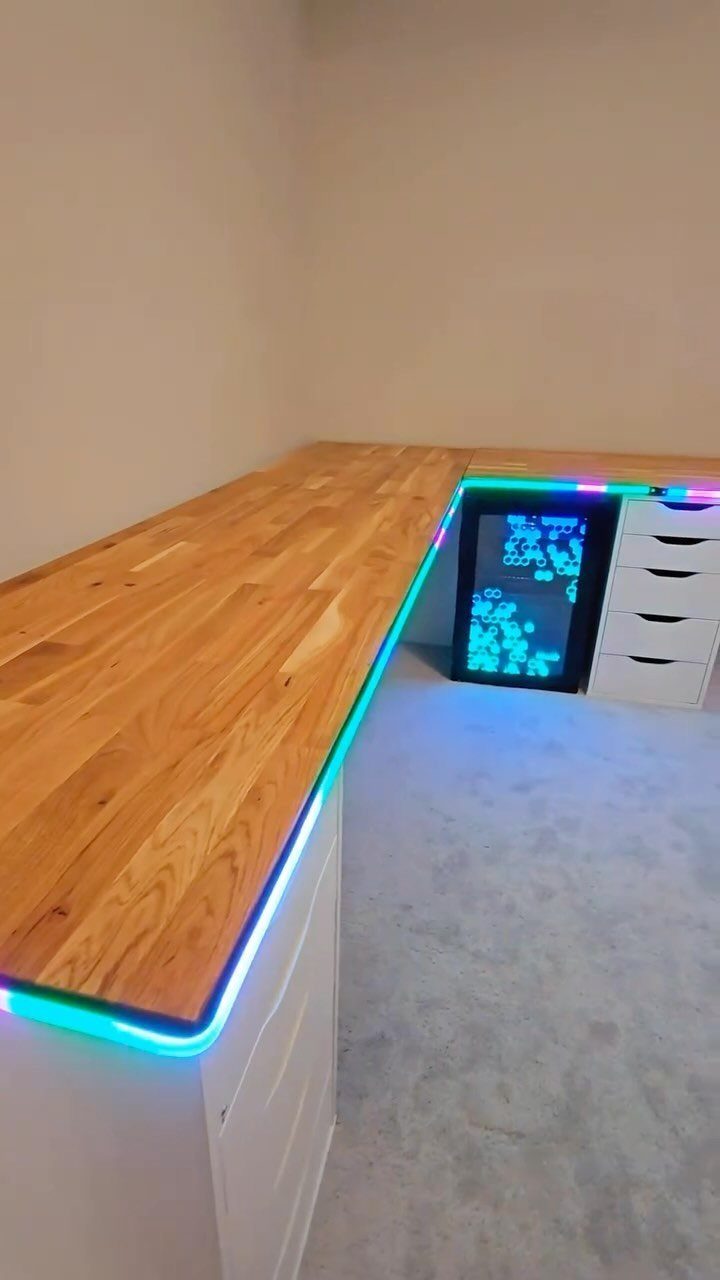
Butcher block across two ALEX drawer units gives an L-shaped desk a warm, heavy top that stock white panels can’t match.
The wood also shows off the cyan LED strip tucked under the edge, which lights the floor and wall behind the desk.
Plan the corner first. Measure both wall runs, then decide which arm gets the drawers, since a drawer unit under each arm keeps the weight even.
LED strips are cheap, and I’d put them on a switch you can reach from the chair.
8. Standing Desk Leg Hybrid
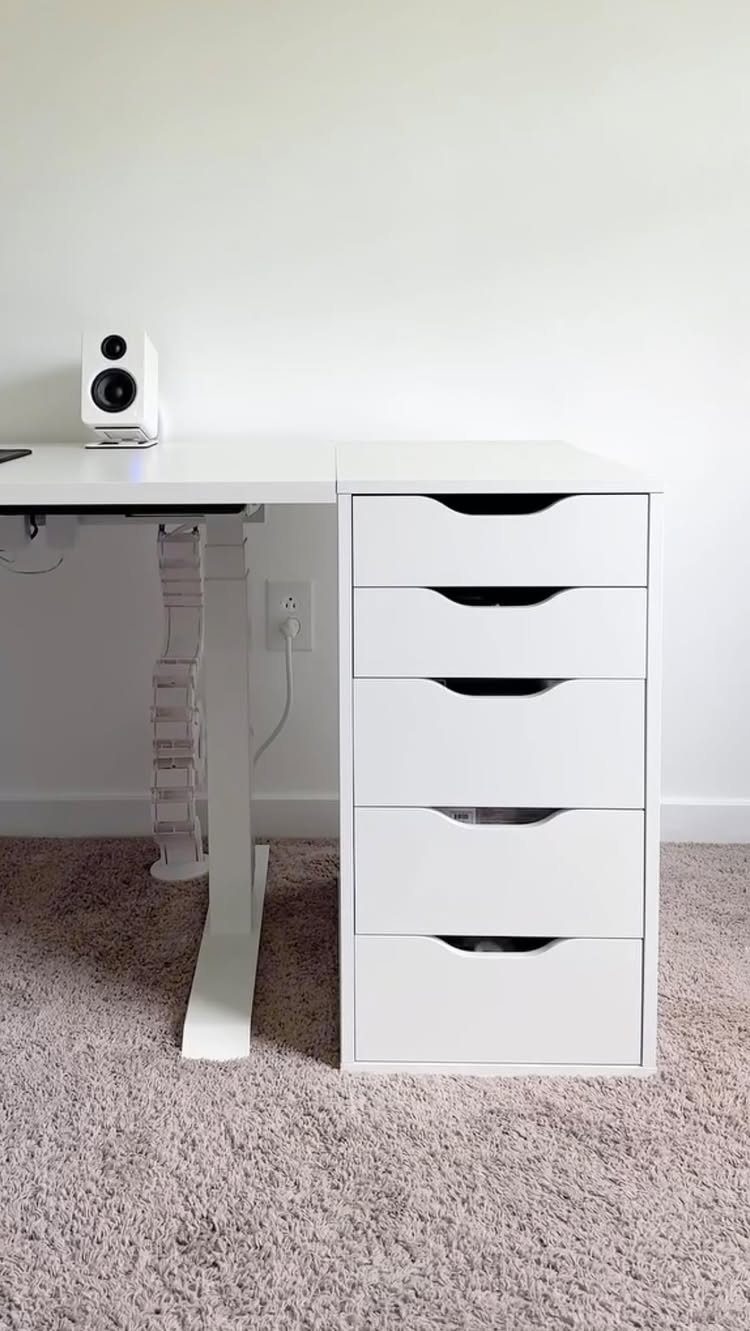
Drawers on one side keep storage close, and the leg handles the height change.
Match the tabletop to the drawer unit in color, as white on white keeps the hybrid looking planned. Check that the top is stiff enough to span the gap, and measure your keyboard height first so the proportions actually work.
9. Desk with Slat Accent Wall
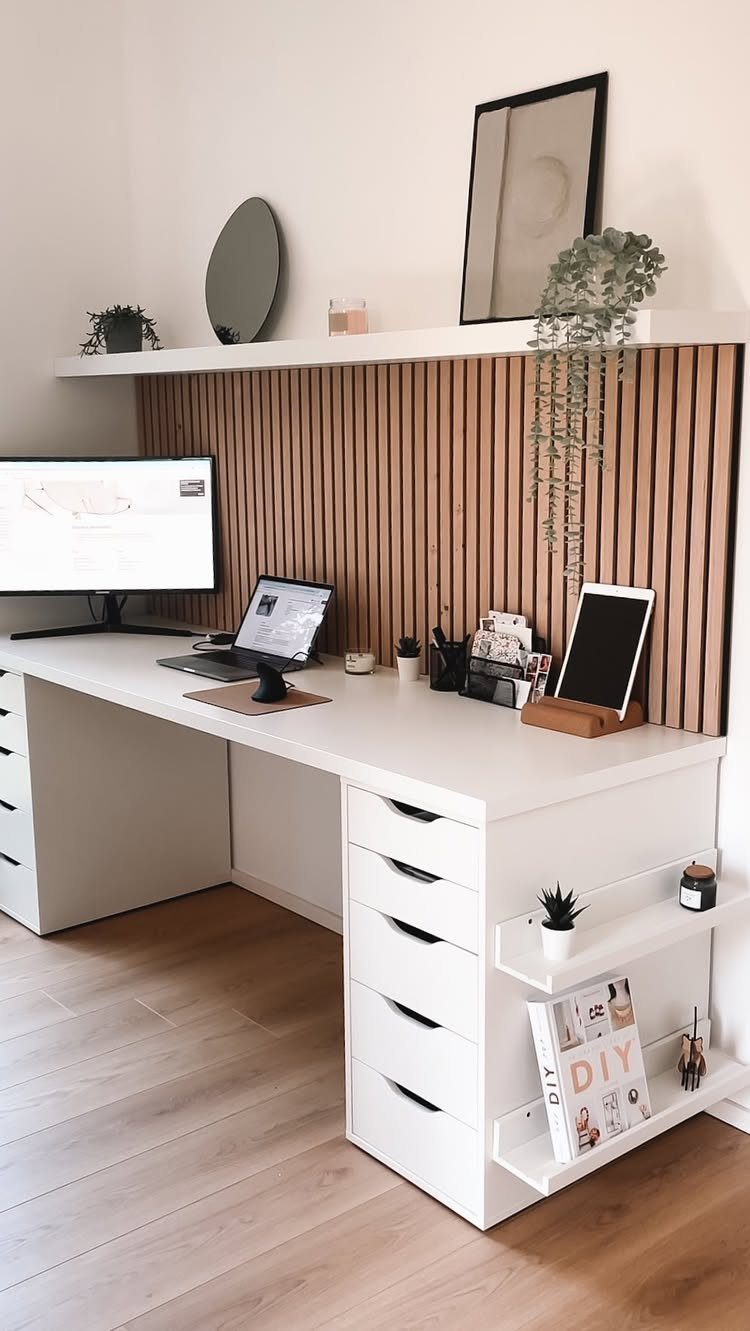
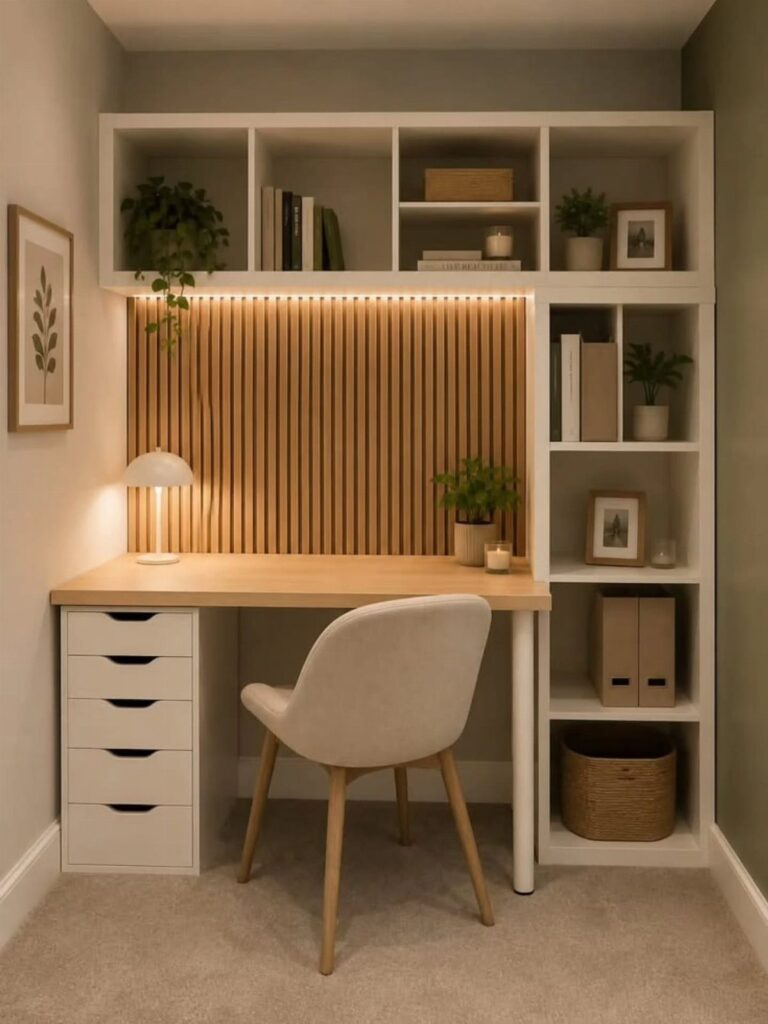
Vertical wood slats behind a white ALEX desk give a plain wall some depth and warmth. Mount them on the wall behind the monitor, then add a white floating shelf above for books and small decor.
I’d keep the desk itself plain, because the slats already supply the texture. Finish the shelf in the same white as the drawers so the wall reads as one composition.
Slats mean screws in the wall, so renters should check the lease first.
10. ALEX Desk with Vanity Mirror
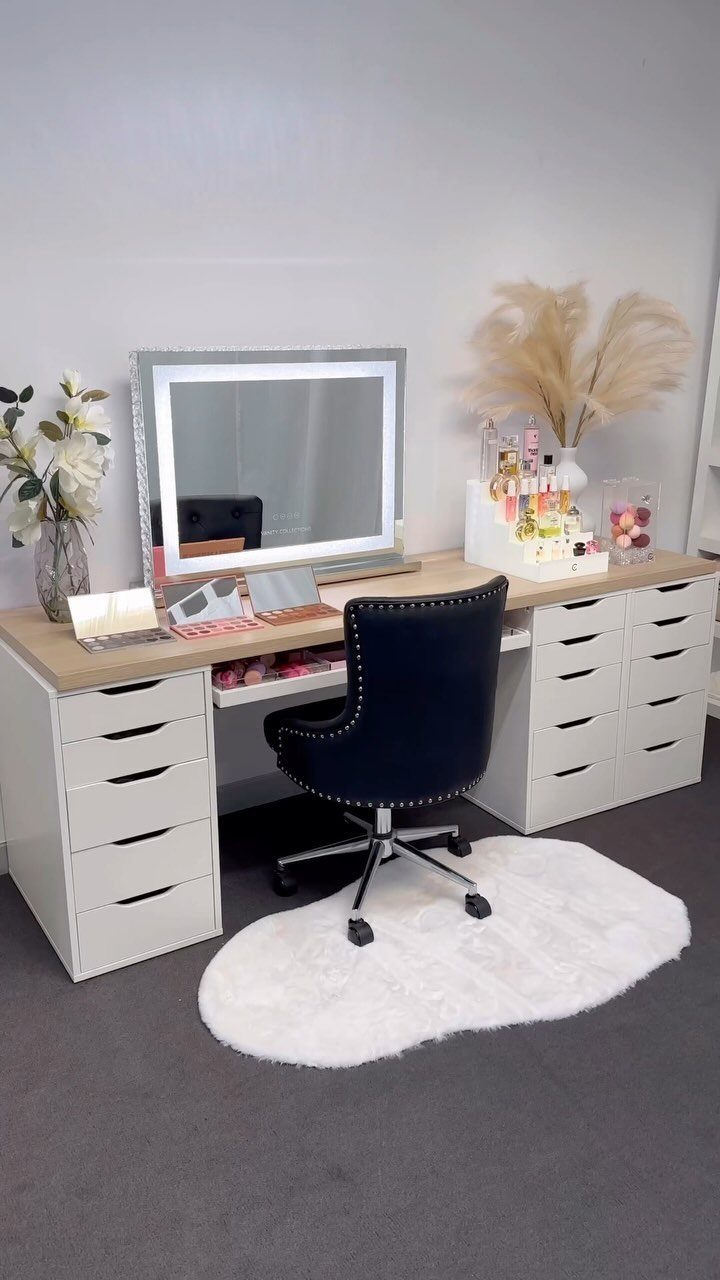
A light wood top over white ALEX drawers works as a makeup vanity as easily as a work desk. Add a large lighted mirror and the same surface handles laptop hours by day and getting ready in the morning.
Drawers do the quiet work here: makeup in the top one, paper and chargers below. Put the mirror where light falls on your face, not behind you.
A black chair sharpens the look against the white and wood, and a rug underfoot softens a hard-working corner.
11. Gaming Setup with Center Support
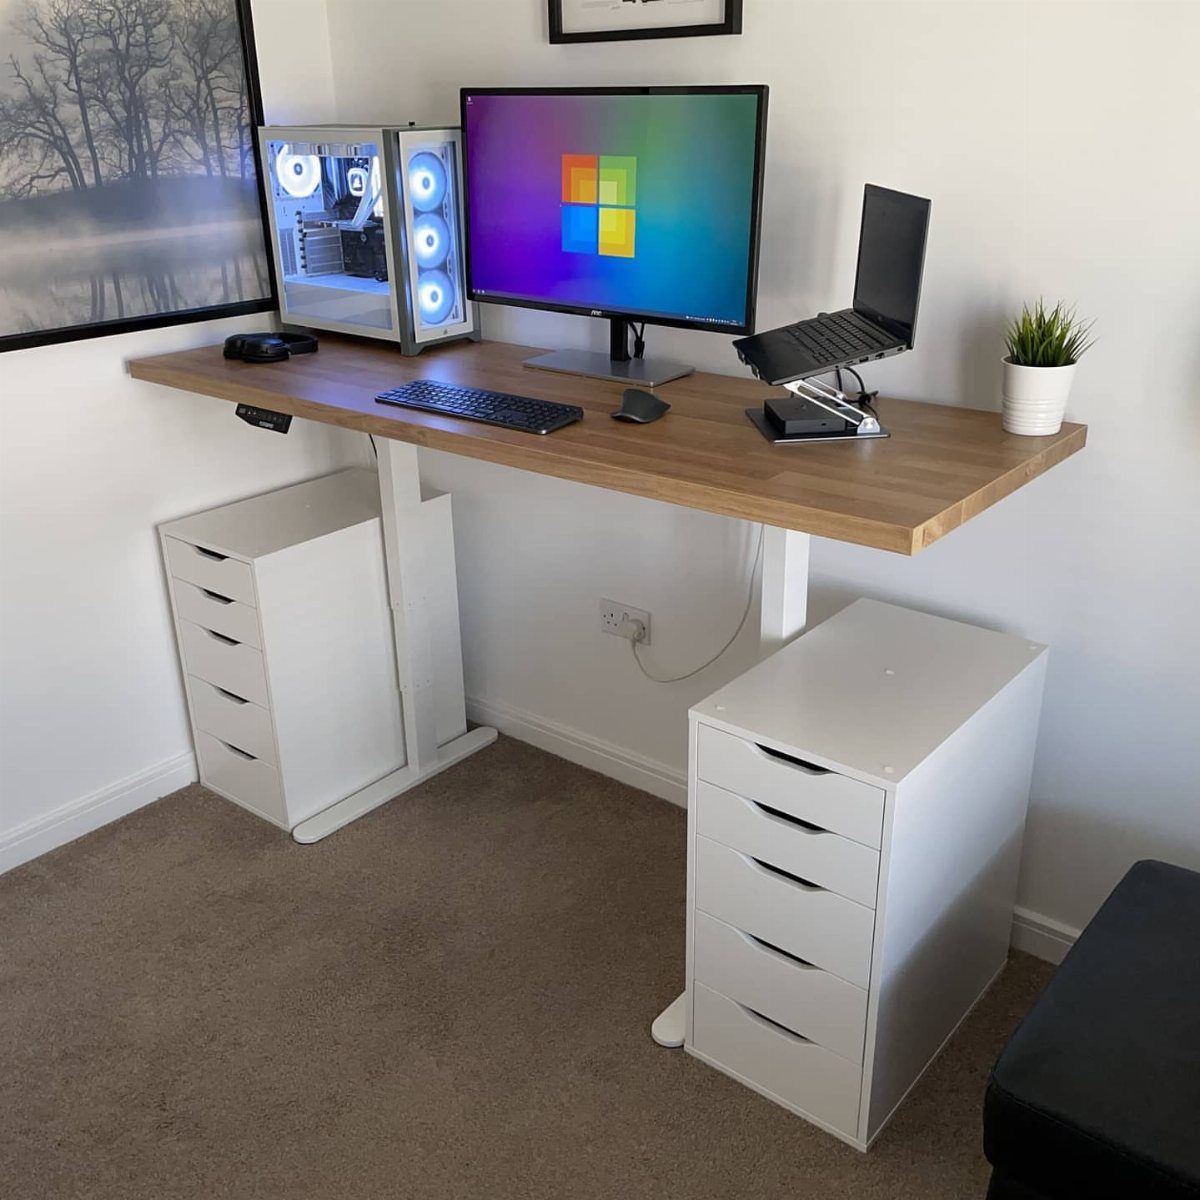
Two ALEX drawer units can hold a wide wooden desktop, but a long span needs a third support.
A center leg between the units keeps the top from sagging under a dual-monitor gaming rig, which is a lot of weight sitting in the middle.
Leave room for knees and a chair between supports. Measure your monitors side by side before cutting the top.
I’d pick a thick wooden top over a thin panel for this setup, since the PC, screens and keyboard all load it at once.
Tools and Materials Needed
For the trim version, a 4-foot poplar hardwood board, 1/4 inch by 1 inch, is the stock to buy, along with gold knobs, wood filler, wood glue, a pencil and a measuring tape.
Add safety glasses, ear protection and a mask, because sanding and cutting throw a lot of fine dust.
For painting, use either Zinsser BIN primer or Extreme Bond Primer.
Both are proven bonding primers, so pick whichever your store stocks. For a deep, muted green, Sherwin-Williams Pewter Green is the shade I’d hold up against the Alex first.
A stained plywood top calls for a different list: two 4 x 8 sheets of red oak plywood, one roll of red oak veneer, 1 quart of wood conditioner, two 1/2 pints of Simply White MinWax stain, matte polyurethane, wood glue and sandpaper.
The conditioner matters, since it keeps the stain from going blotchy.
Cost-Effective Solutions
ALEX units are simple, plain boxes, and that is why they hack so well. Because the design is so basic, a little paint, new hardware or contact paper changes the look completely.
Start with the easiest change and live with it for a week. If the desk still feels plain, move on to trim or a custom top.
Style is flexible too. The stock look is modern, but the same unit can lean farmhouse, industrial or mid-century depending on the finish and hardware you choose.
Match the knobs and top to the style first, since those 2 parts do most of the work.
Preparation Steps
Scuff every surface you plan to paint with fine paper, around 120–220 grit, just enough to dull the factory sheen without cutting through the laminate.
Sand until every shiny patch has gone flat and matte, because any gloss left behind gives the paint nothing to grip.
Drag your palm across the top and sides: a properly scuffed surface feels slightly gritty, and slick spots mean you need another pass.
Paint laid over untouched factory finish tends to lift at the edges and scratch off within weeks.
Wipe the dust off with a cloth before priming. You can paint the pieces assembled or flat-packed; the steps are the same.
If you add trim, let the glue dry fully. Press wood filler into any gaps and nail holes, let it dry, then sand it flush so the repairs vanish under the paint.
Frequently Asked Questions
What is the best way to paint IKEA furniture?
Scuff-sand every surface with 120–220 grit paper until no shiny patch is left, wipe off the dust, prime with a bonding primer such as Zinsser BIN or Extreme Bond, then paint.
Scuffing the surface gives primer a texture to bite into; skip that step and the paint peels along the edges and scrapes off in a few weeks.
Eggshell is my pick because it wipes down easier than flat, and laying the drawer fronts on a table while they dry keeps the paint from running. 2 coats of paint is the common advice for durability.
What materials do I need for an IKEA desk hack?
It depends on the hack.
A painted version needs a bonding primer and paint. For any of them, add safety glasses, ear protection and a mask, since sanding and cutting throw off fine dust.